Does your Figma Plugin really need an UI?
An headless approach to Figma plugins
So, have you heard creating Figma plugins just got easier?
We can now create headless plugins and that is a great news 🥳
Check the full post there.
I've wrote in the past about creating your Figma plugin using svelte. And you should consider using that method if you need an UI for your plugin.
However, if your scope is smaller, why bother creating an UI at all?
A lot of plugins just need one or two inputs from the user to operate, and the Plugin Parameters covers that need.
The Headless approach means we don't need an UI, no HTML, no CSS, no need to pack a reactive framework.
Just vibes 😎
Prerequisites
To follow this post, you'll need to have already worked on JS projects before. A basic understanding of TypeScript can help too.
You need to have a node development environment and yarn or npm.
You can use Windows or Mac. You cannot test plugins on the Linux desktop app for now unfortunately, so Setup WSL if you are using Windows.
Setup
I'm using yarn on this process because I like it, but everything works with NPM too.
Open a Terminal in your project folder. Let's create a repository for our plugin and set up our package manager:
mkdir <your-plugin-name>
cd <your-plugin-name>
yarn init
Let's now open our project in our code editor. Here is for VS Code users :
code .
We'll build our JS using rollup. We can use modern JS/TS with importas an input and it will output a built JS with needed dependencies attached.
Let's add necessary dev dependencies:
yarn add -D rollup @rollup/plugin-node-resolve @rollup/plugin-commonjs rollup-plugin-terser @rollup/plugin-typescript typescript tslib @figma/plugin-typings
Let's create a src folder and let's put in it an empty code.ts file.
We'll use TypeScript so we can get Figma plugin API types definitions. Very useful 😁
Then create a rollup.config.js at the root of our project and throw it that:
import resolve from '@rollup/plugin-node-resolve'
import commonjs from '@rollup/plugin-commonjs'

// Minifier
import { terser } from 'rollup-plugin-terser'

// Typescript
import typescript from 'rollup-plugin-typescript'

const production = !process.env.ROLLUP_WATCH

export default [
  // CODE.JS
  // The part that communicate with Figma directly
  // Communicate with main.js via event send/binding
  {
    input: 'src/code.ts',
    output: {
      file: 'public/code.js',
      format: 'iife',
      name: 'code',
    },
    plugins: [
      typescript(),
      resolve(),
      commonjs({ transformMixedEsModules: true }),
      production && terser(),
    ],
  },
]
This will build src/code.ts to public/code.js.
Let's create a script for it in our package.json:
"scripts": {
    "build": "rollup -c",
    "dev": "rollup -c -w",
  },
We can now run yarn dev and yarn build. The dev script will watch any changes while the build will just execute once.
Last thing we need to do is to add a tsconfig.json file at the root and write down:
{
  "compilerOptions": {
    "baseUrl": ".",
    "target": "esnext",
    "moduleResolution": "node",
    "esModuleInterop": true,
    "typeRoots": ["./node_modules/@types", "./node_modules/@figma"]
  },
  "include": ["./src"]
}
That'll handle TS for our project.
We already have a working development environment ! Yay!
Next section is about registering your plugin in Figma so you can try it 🥰
Registering the plugin
We need a manifest.json to interact with Figma. It'll define the name of our plugin, the location of your plugin itself (here public/main.js, the file we built with rollup) and later we'll add the parameters there.
Create manifest.json at the root of your project and copy paste this:
{
  "name": "<your-plugin-name>",
  "id": "<fill-that-before-publish>",
  "api": "1.0.0",
  "main": "public/code.js",
  "parameterOnly": true
}
On any Figma project, you can Right click → Plugins → Development → New Plugin... and choose a manifest file.
Select the newly created manifest.json and you can now launch your plugin in Figma by doing Right click → Plugins → Development → <your-plugin-name>.
You can also Cmd/Ctrl+P and type the plugin name, super useful shortcut
Nothing will happen if you launch it yet though. The next section is about getting a plugin that actually does something.
Defining parameters
In this section, our plugin will create a square or a circle and ask for its size.
This simple example will show you enough to create your own thing afterward.
Our example needs two parameters: type and size. Let's add them at the end of our manifest.json:
{
  ...
	"parameters": [
		{
			"name": "Shape type",
			"key": "type"
		},
		{
			"name": "Shape size",
			"key": "size"
		}
	]
}
Next step let's fill our code.ts with:
// This part is about getting the params from our user
figma.parameters.on(
  'input',
  (
    {parameters, key, query, result}: ParameterInputHandlerArgs
  ) => {
    switch (key) {
      case 'type':
        const types = ['Square', 'Circle', 'Star']
        result.setSuggestions(types.filter((s) => s.includes(query)))
        break
      case 'size':
        const sizes = ['50', '100', '200', '400']
        result.setSuggestions(sizes.filter((s) => s.includes(query)))
        break
      default:
        return
    }
  }
)

// This part is about actually doing the stuff
figma.on('run', async (event: RunEvent) => {
  if (event.parameters) {
    console.log(event.parameters)
  }

  figma.closePlugin()
})
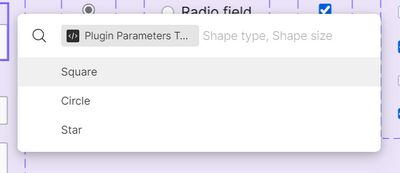
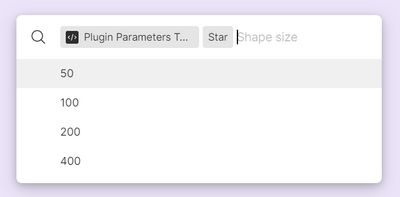
This code will handle the suggestion for typeandsize. It'll also close the plugin when this is done. Nothing more for now.
When launched, it should look like this:

The Figma UI prompting for the Shape Type parameter

The Figma UI prompting for the Shape Size parameter
This post is not about interacting with the Figma API itself, so we'll skip that.
Here how your code.ts should look like:
// We define how our parameters look like
interface PluginParameters {
  size: string
  type: 'Square' | 'Circle' | 'Star'
}

// This part is about getting the params from our user
figma.parameters.on(
  'input',
  (
    {parameters, key, query, result}: ParameterInputHandlerArgs
  ) => {
    switch (key) {
      case 'type':
        const types = ['Square', 'Circle', 'Star']
        result.setSuggestions(types.filter((s) => s.includes(query)))
        break
      case 'size':
        const sizes = ['50', '100', '200', '400']
        result.setSuggestions(sizes.filter((s) => s.includes(query)))
        break
      default:
        return
    }
  }
)

// This part is about actually doing the stuff
figma.on('run', async (event: RunEvent) => {
  if (event.parameters) {
    const params = event.parameters as PluginParameters

    let node: RectangleNode | EllipseNode | StarNode

    // We draw a shape
    if (params.type == 'Square') {
      node = figma.createRectangle()
    } else if (params.type == 'Circle') {
      node = figma.createEllipse()
    } else if (params.type == 'Star') {
      node = figma.createStar()
    }

    // And we apply the size
    node.resize(parseInt(params.size), parseInt(params.size))
  }

  // We close the plugin
  figma.closePlugin()
})
And that's it!
Congrats, you have a working Figma headless plugin now 😎
This sandbox is now yours to play with!
Going headless is a great way of doing quality of life plugins that does the small things that counts.
If you want to go deeper and create a plugin with an UI, you can read my post on creating a plugin with Svelte.
I hope this post will motivate you to create your own plugin 😊
If you have an idea, go for it!
Publishing my own plugins was a great experience to me! Seeing the community actually using it and gives you feedback is awesome!
I'm Tom Quinonero, I write about design systems and CSS, Follow me on twitter for more tips and resources 🤙